Berikut ini baccalah.blogspot.com bagikan Tips Trik Konfigurasi Modem 3G / HSDPA Huawei E173 pada Mikrotik PC Router.
Sebelum kita mulai konfigurasi, di sini saya tunjukkan dulu kaitannya Modem 3G / HSDPA pada Mikrotik PC Router versi 3.20 tidak terdeteksi secara otomatis.
Pada Mikrotik PC Router versi 4.17, Modem USB 3G / HSPDA sudah terdeteksi dan berfungsi dengan baik.
Selanjutnya
Showing posts with label tutorial. Show all posts
Showing posts with label tutorial. Show all posts
Sunday, June 17, 2012

Saturday, May 19, 2012
Video Tutorial Konfigurasi Dasar Mikrotik
Video Tutorial Konfigurasi Dasar Mikrotik
Video Tutorial Konfigurasi Dasar Mikrotik
- Mikrotik RouterOS Adalah versi MikroTik dalam bentuk perangkat lunak
yang dapat diinstal pada komputer rumahan (PC) melalui CD. Anda dapat
mengunduh file image MikroTik RouterOS dari website resmi MikroTik.
Namun, file image ini merupakan versi trial MikroTik yang hanya dapat
dalam waktu 24
Friday, May 18, 2012
Tutorial Instalisasi Dasar Oracle 10g untuk OS Windows
Untuk
mengistalisasi Oracle Software kita akan menggunakan Oracle Universal
Installer (OUI). OUI adalah tool yang memungkinkan kita untuk
menginstall Oracle pada PC dengan keterpanduan-kemudahan yang
berbasiskan GUI (Grapihcs User Interface). Didalam OUI terdapat beberapa
pilihan dasar perlakuan terhadap Oracle Software, yaitu Install New
Oracle Software dan Deinstall Oracle Software. OUI
Thursday, May 17, 2012
Tutorial Dasar-Dasar Membuat Web Dengan HTML
Tutorial Dasar-Dasar Membuat Web Dengan HTML
Nah, anda pasti sudah banyak melihat tutorial tutorial HTML yang ada di baccalah. Tapi, masih ada 1 kekurangan, tutorial HTML untuk tingkat pemula???
Nggak ada kan??? nah, maka dari itu, saya, C.H.I.P. Sensei, akan menjelaskan bagaimana website di bangun menggunakan tag-tag HTML, dan ini penulis sediakan untuk pemula. Tapi sebelum itu,? ada yang
Nah, anda pasti sudah banyak melihat tutorial tutorial HTML yang ada di baccalah. Tapi, masih ada 1 kekurangan, tutorial HTML untuk tingkat pemula???
Nggak ada kan??? nah, maka dari itu, saya, C.H.I.P. Sensei, akan menjelaskan bagaimana website di bangun menggunakan tag-tag HTML, dan ini penulis sediakan untuk pemula. Tapi sebelum itu,? ada yang
Tutorial Dasar Mikrotik RouterOS
Tutorial Dasar Mikrotik RouterOS
2Day Workshop Mikrotik EXPERT
MikroTik RouterOS™, merupakan system operasi Linux base yang diperuntuk
kan sebagai network router. Didesain untuk memberikan kemudahan bagi
penggunanya. Administrasinya bisa dilakukan melalui Windows application
(WinBox). Webbrowser serta via Remote Shell (telnet dan SSH). Selain
itu instalasi dapat dilakukan pada Standard
2Day Workshop Mikrotik EXPERT
MikroTik RouterOS™, merupakan system operasi Linux base yang diperuntuk
kan sebagai network router. Didesain untuk memberikan kemudahan bagi
penggunanya. Administrasinya bisa dilakukan melalui Windows application
(WinBox). Webbrowser serta via Remote Shell (telnet dan SSH). Selain
itu instalasi dapat dilakukan pada Standard
Tutorial Mikrotik VPN : Point to Point Tunnel Protocol
PPTP (Point to Point Tunnel Protocol) supports encrypted tunnels over
IP. The MikroTik RouterOS implementation includes support fot PPTP
client and server.
General applications of PPTP tunnels:
* For secure router-to-router tunnels over the Internet
* To link (bridge) local Intranets or LANs (when EoIP is also used)
* For mobile or remote clients to remotely access an Intranet/LAN of a
Tutorial Setting Firewall untuk Router Mikrotik
Tutorial Setting Firewall untuk Router Mikrotik
Pengamankan router mikrotik dari traffic virus dan excess ping dapat digunakan skrip firewall berikut
Pertama buat address-list "ournetwork" yang berisi alamat IP radio, IP LAN dan IP WAN atau IP lainnya yang dapat dipercaya
Dalam
contoh berikut alamat IP radio adalah = 10.0.0.0/16, IP LAN =
192.168.2.0/24 dan IP WAN = 203.89.24.0/21 dan
Monday, May 14, 2012
Tutorial dan Workshop Mikrotik Expert
2Day Workshop Mikrotik
“MIKROTIK PC ROUTER UNTUK BANDWITH MANAGEMEN & SECURITY PROTECTION – VPN SERVER & WEB PROXY MIKROTIK”
Teknologi Informasi yang saat ini sangat berkembang pesat sehingga
memerlukan peningkatan Proteksi Security System Jaringan bagi IT
Perusahaan da...n WARNET dibidang Networking System, Network Security System, Firewall Filtering, dan Bandwith Managemen.
Teknologi
Saturday, November 7, 2009
Tutorial: Quick Gradient polish and Konad Stamping
Woohoo! 50th post on here (that number seems a bit odd to me, but that's the count blogspot is giving me. Anyways, Babybubblz requested I do a Konad tutorial, so today I'm writing out a quick tutorial (with pictures) regarding Konads, using today's NOTD as an example.
This is today's NOTD. My inspiration for this was the colors of autumn leaves...unfortunately, Konad doesn't see, to have a leaf design..just lots of flowers. The result reminds me more of Chinese New Year.
 This is what I used for this endeavor; Base coat, Top coat, a white polish (I used ORLY White Tips), and 4 konad special polishes (you can use less, for the gradient I suspect that normal polishes would work), a plastic plate, a sponge, a konad plate, scraper, and stamp.
 1. Since I don't feel like redoing my nails right now, I did this tutorial using a plastic plate. First, apply your favorite base coat. This will help your polish last longer and prevent staining. After this dries, apply the white polish to your nails. This will help the colors stand out more, and should prevent any staining if you're using the special polishes.
 2. After the white polish dries, swatch the colors you will be using on a plastic plate next to each other. I used 3 polishes for this, but I'm sure you can get away with any 2 colors you want. I used the special polishes that came with the salon set, but I think regular polishes might work as well for this, particularly ones that are easily opaque in 1 or 2 coats.
 3. Press your sponge onto the plate to pick up the color.
For the sponge, I know Konad makes packs of sponges from the catalog that came with my salon kit, but I'm not sure where you'd get them as wowsocool.com and OCnailart don't sell these packs (They do sell Konad Sponge Nail art kits, but I don't think the mini kits come with a lot of sponges). The sponges in the kit feel a lot like some packing foam, so maybe you can use those.
 4. Dab the sponge onto your nails. You may have to repeat steps 2-4 until you get your desired opacity. (particularly if you aren't using special polishes) The result will look kind of texturized, as so..not a big deal...we'll be fixing this with the next step. Unfortunately I neglected to wait for the white polish to dry completely before doing the sponge art, so it messed up the results just a bit.
Here's what it basically looks like with a white base under the colors:
 Here's what it looks like without the base; the colors over a base look more vibrant.
 You don't have to let this dry all the way.
5. Take your favorite top coat and apply it over the gradient. Use it to blend the colors together. (You can see how it became kind of messy since I didn't let the white dry all the way..so the rest of this tutorial I will use the one without the base)
white base:
 No base:
 6. Clean up the area around your nails with a q-tip and remover. Voila! you're done creating a cool, easy to do gradient. It doesn't take much longer than a regular mani.
That concludes the gradient portion of the tutorial. One thing to watch out for when doing this is: dab gently...dabbing harder transfers color more easily, but you're more likely to get it all over your cuticles like I did.
If you want to put a pattern on top of this like I did, here's what you do:
1. Pick any design you desire. I used a design from plate m5.
 2. Swatch the special polish of your choice over the design
 3. Scrape off the excess polish with your scraper. I prefer the plastic scrapers. They don't scratch up the plate as much and leave the right amount of polish remaining. (sorry, blurry pic)
 You don't have to perfectly scrape away all of the polish...streaks are fine as long as they aren't thick.
 4. Pick up the design with your stamp. To do this, simply press the rubber stamp down on the design quickly after scraping. Speed is key for this since the polish will dry fairly quickly, making it hard to pick up the full design if you're slow. The easiest way I've found to do this is after applying the special polish to the plate, I scrape off the excess polish with my left (nondominant) hand, then follow by pressing the stamp down with my right (dominant). I also really like the double ended stamper. The smaller end is great for picking up partial designs, which gives you more things you can do with a plate.
 5. Transfer the design onto your nail with a a gentle rolling motion. Unlike the last step, you don't need to do this that quickly. Take your time to line up the design where you want it. (Don't take TOO long though or the design will set on the stamp).
 6. Let the design set a bit by waiting a few minutes, then lock the design in with your favorite top coat. Apply the top coat quickly to your nail, don't go over the same brush stroke twice. If you go over the same area more than 1x, you have a good chance of smudging the pattern. This was also the reason why it was easy to use top coat to blend the gradient in the above tutorial. Instead, if you feel that your application of the top coat was uneven, go over it a 2nd time after the first coat of TC has dried.
That concludes the stamping portion of my tutorial. One of the things I really like to do before stamping is apply a layer of top coat between whatever polish I'm using and the design. It helps the layers beneath dry faster, ensuring that I'm less likely to mess up what I've already done. The 2nd reason why I do this is because If I mess up stamping the design, I don't have to start over. What I do is I wet a qtip with remover, and use it to gently remove the pattern from the nail. This way I don't take any of what I'm stamping over away and can just stamp on top of it. This does take away the shine already on my nail, but since I use top coat to lock the design onto my nail, this doesn't become an issue. I hope you enjoyed this tutorial.
This is today's NOTD. My inspiration for this was the colors of autumn leaves...unfortunately, Konad doesn't see, to have a leaf design..just lots of flowers. The result reminds me more of Chinese New Year.

 This is what I used for this endeavor; Base coat, Top coat, a white polish (I used ORLY White Tips), and 4 konad special polishes (you can use less, for the gradient I suspect that normal polishes would work), a plastic plate, a sponge, a konad plate, scraper, and stamp.
  1. Since I don't feel like redoing my nails right now, I did this tutorial using a plastic plate. First, apply your favorite base coat. This will help your polish last longer and prevent staining. After this dries, apply the white polish to your nails. This will help the colors stand out more, and should prevent any staining if you're using the special polishes.
 2. After the white polish dries, swatch the colors you will be using on a plastic plate next to each other. I used 3 polishes for this, but I'm sure you can get away with any 2 colors you want. I used the special polishes that came with the salon set, but I think regular polishes might work as well for this, particularly ones that are easily opaque in 1 or 2 coats.
 3. Press your sponge onto the plate to pick up the color.
For the sponge, I know Konad makes packs of sponges from the catalog that came with my salon kit, but I'm not sure where you'd get them as wowsocool.com and OCnailart don't sell these packs (They do sell Konad Sponge Nail art kits, but I don't think the mini kits come with a lot of sponges). The sponges in the kit feel a lot like some packing foam, so maybe you can use those.
 4. Dab the sponge onto your nails. You may have to repeat steps 2-4 until you get your desired opacity. (particularly if you aren't using special polishes) The result will look kind of texturized, as so..not a big deal...we'll be fixing this with the next step. Unfortunately I neglected to wait for the white polish to dry completely before doing the sponge art, so it messed up the results just a bit.
Here's what it basically looks like with a white base under the colors:
 Here's what it looks like without the base; the colors over a base look more vibrant.
 You don't have to let this dry all the way.
5. Take your favorite top coat and apply it over the gradient. Use it to blend the colors together. (You can see how it became kind of messy since I didn't let the white dry all the way..so the rest of this tutorial I will use the one without the base)
white base:
 No base:
 6. Clean up the area around your nails with a q-tip and remover. Voila! you're done creating a cool, easy to do gradient. It doesn't take much longer than a regular mani.
That concludes the gradient portion of the tutorial. One thing to watch out for when doing this is: dab gently...dabbing harder transfers color more easily, but you're more likely to get it all over your cuticles like I did.
If you want to put a pattern on top of this like I did, here's what you do:
1. Pick any design you desire. I used a design from plate m5.
 2. Swatch the special polish of your choice over the design
 3. Scrape off the excess polish with your scraper. I prefer the plastic scrapers. They don't scratch up the plate as much and leave the right amount of polish remaining. (sorry, blurry pic)
 You don't have to perfectly scrape away all of the polish...streaks are fine as long as they aren't thick.
 4. Pick up the design with your stamp. To do this, simply press the rubber stamp down on the design quickly after scraping. Speed is key for this since the polish will dry fairly quickly, making it hard to pick up the full design if you're slow. The easiest way I've found to do this is after applying the special polish to the plate, I scrape off the excess polish with my left (nondominant) hand, then follow by pressing the stamp down with my right (dominant). I also really like the double ended stamper. The smaller end is great for picking up partial designs, which gives you more things you can do with a plate.
 5. Transfer the design onto your nail with a a gentle rolling motion. Unlike the last step, you don't need to do this that quickly. Take your time to line up the design where you want it. (Don't take TOO long though or the design will set on the stamp).
 6. Let the design set a bit by waiting a few minutes, then lock the design in with your favorite top coat. Apply the top coat quickly to your nail, don't go over the same brush stroke twice. If you go over the same area more than 1x, you have a good chance of smudging the pattern. This was also the reason why it was easy to use top coat to blend the gradient in the above tutorial. Instead, if you feel that your application of the top coat was uneven, go over it a 2nd time after the first coat of TC has dried.
That concludes the stamping portion of my tutorial. One of the things I really like to do before stamping is apply a layer of top coat between whatever polish I'm using and the design. It helps the layers beneath dry faster, ensuring that I'm less likely to mess up what I've already done. The 2nd reason why I do this is because If I mess up stamping the design, I don't have to start over. What I do is I wet a qtip with remover, and use it to gently remove the pattern from the nail. This way I don't take any of what I'm stamping over away and can just stamp on top of it. This does take away the shine already on my nail, but since I use top coat to lock the design onto my nail, this doesn't become an issue. I hope you enjoyed this tutorial.
Tuesday, February 24, 2009
Tutorial-Reviving Gel liners
So I've been swatching quite a bit for the last few days, but for the most part, I've been too lazy to blog about any of it for various reasons..with the main one being this:
 My kitten lovingly likes to spend a good 5-10 minutes blocking my computer screen...and my laptop has no imaging programs for labeling ^^; (not to mention that my keyboard on that's a bit busted..and my desktop has some hardware issues as well...) There isn't a whole lot of swatching in this post as well, but at least there's pictures this time. YAY! So anyways, today I'll be teaching you how to revive a dried out gel liner (or change the consistency on your drier textured liners)

 If you are using a wax applicating stick, you may choose to break the stick in half, allowing to use the same stick to revive 2 liners.
 2. Add 2-3 drops of your eye drops to the liner. You don't need a whole lot ofo this to revive your liner. If you find you need more later, you can add it in, but adding too much will cause your gel liner to lose its consistency, and your liner will not apply as nicely.


3. Start mixing. If you are using a toothpick, you will have to make sure to mash your liner well, breaking up any chunks.
 When it is done, you should have a nice, creamy consistency:
 Personally, I found it much easier to mix with the small wax applicator I was using..it took much longer for me to use a toothpick..but you use what you can ;)
 4: Final step: pat your gel liner back down in its container, smoothing it over the best you can. You may want to clean up the edges and scrape off as much of the liner off your mixing tool as possible. There will still be a bunch of it stuck to the stick, but it's not a huge loss considering the fact that you're saving money by not having to buy a new liner.

 Congratulations: your gel liner is now revived!
 My kitten lovingly likes to spend a good 5-10 minutes blocking my computer screen...and my laptop has no imaging programs for labeling ^^; (not to mention that my keyboard on that's a bit busted..and my desktop has some hardware issues as well...) There isn't a whole lot of swatching in this post as well, but at least there's pictures this time. YAY! So anyways, today I'll be teaching you how to revive a dried out gel liner (or change the consistency on your drier textured liners)
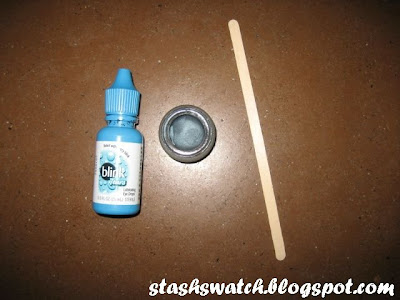
1. Before you begin, you will need the following items: your dried out gel liner, eye drops (the regular kind, for dry eyes--I am using Blink Tears in this tutorial, but Visine works quite well for this as well. DO NOT USE CONTACT SOLUTION. It won't hold up as well), something to mix with, and something to smooth your liner back down with. You can choose to use a toothpick to stir, or a spatula or small wax applicating stick, whatever you find. For the green liner, I used a toothpick to stir with and a brush to smooth it back down. For the blue-grey one I simply used a small stick.

 If you are using a wax applicating stick, you may choose to break the stick in half, allowing to use the same stick to revive 2 liners.
 2. Add 2-3 drops of your eye drops to the liner. You don't need a whole lot ofo this to revive your liner. If you find you need more later, you can add it in, but adding too much will cause your gel liner to lose its consistency, and your liner will not apply as nicely.

3. Start mixing. If you are using a toothpick, you will have to make sure to mash your liner well, breaking up any chunks.
 When it is done, you should have a nice, creamy consistency:
 Personally, I found it much easier to mix with the small wax applicator I was using..it took much longer for me to use a toothpick..but you use what you can ;)
 4: Final step: pat your gel liner back down in its container, smoothing it over the best you can. You may want to clean up the edges and scrape off as much of the liner off your mixing tool as possible. There will still be a bunch of it stuck to the stick, but it's not a huge loss considering the fact that you're saving money by not having to buy a new liner.
 Congratulations: your gel liner is now revived!
Subscribe to:
Posts (Atom)